Thursday, January 29, 2015

How to Uninstall Shadow Defender without a password.


·         Boot with a Live CD/DVD/USB
·         Rename all files named diskpt0.sys located at the root directory of all HDDs (ex. diskpt0.sys.bak)
Rename diskpt0.sys

·         Rename Shadow Defender folder (ex. Shadow Defender 2)
Rename Shadow Defender folder

·         Reboot the PC
·         Rename Shadow Defender 2 back to Shadow Defender  
·         Uninstall and reboot 
·         Delete all diskpt0.sys.bak

·         Delete all left over Shadow Defender folders


·         Run CCleaner and Scan for Issues

Why rename instead of delete, just in case something went wrong in your removal process, you have a fall back position to revert your changes.

Please join me at Pinoy Tech RAMBO

Monday, January 12, 2015

Advanced SystemCare Pro


Advanced System Care 8 Pro (3 months)

Convert ASC 8 from Free to Pro.

Instructions:

  • Download ASC 8 Free using the above link
  •  Install
  •  Try to Uninstall ASC 8.  It will give you an offer to try ASC 8 Pro for three months.

Click Get Advanced SystemCare Pro for FREE

Click OK


  • Now you have a 3 month license of the Pro Version

ASC 8 Pro

Tuesday, January 6, 2015

Ultimate Guide in Removing VBS Worms

Ultimate Guide in Removing VBS Worms


In this tutorial, I'll be talking about a quick way of removing computer malware specifically the VBS worms.  Removal involves the following steps:

  • Terminating the malicious process
  • Removal of the startup entries associated with the worm
  • Deletion of the VBS file including its drop files
After that you can do a full scan with your updated antivirus or antimalware.

VBS worms comes in different shapes and sizes.  Some are easy to read while most of the strains now are encripted so it's content are not easily readable.  Some strains are simply annoying like infecting all external drives inserted in an infected system, to creating shortcuts.  Some are even written to steal passwords.  Whatever the strain is, disinfection and removal can be performed using the above three steps mentioned above.

How I arrived on which files other than the VBS worms are to be deleted are based my quick analysis.  I simply reverse the effect the worm may have on an infected system.  There's no need for me to do a very comprehensive analysis since majority of the worms are already detected by commrcial antivirus solutions.  There's no need to reinvent the wheel.  My approach is to make your scanning effective by terminating any malicious process there is before doing a full scan since most AVs available can repair whatever a VBS worm may have done in the Windows registry.

Specifics in removing known or unknown strains will be covered in future tutorials.


Terminating the malicious process

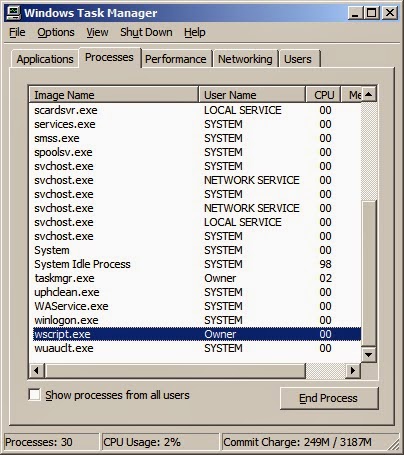
Majority of the VBS worms I encountered i.e. about 98% I've analyzed can be stopped by killing the wscript.exe process.  Less than a handful of samples assembles an executable file when first run and execute that file instead everytime Windows starts.

Using Windows Task Manager

Assuming that Task Manager is not disabled by the worm, the easiest solution is to use it to terminate the malicious process.


Terminate wscript.exe using taskman
Using taskman to terminate the vbs worm process

Highlight wscript.exe process and click on the End Process button.


Using taskkill

Another approach is to use taskkill.exe at the CMD prompt.

taskkill /f /im wscript.exe

Taskkill
Using taskkill to terminate the vbs worm process

Using a 3rd party alternative to Windows Task Manager

So far, this is the best solution since these utilities have a lot more to offer compared to the plain vanilla taskman.  There are many great alternatives, both commercial and freeware.  Since I'm familiar with System Explorer and DTaskmanager, I'll be using either of the two in my manual removal instructions.  Both tools are freeware by the way.


Using System Explorer to terminate the vbs worm process
Using DTaskmanager to terminate the vbs worm process

Just like in taskman, highlight wscript.exe and terminate the process.  Notice that you have more options with DTaskmanager.  Unlike taskman, you can see the VBS file name and its path within System Explorer.


Removal of the startup entries associated with the worm

There are more than one way to skin a cat.  Same with malware removal. You can use regedit or use a registry script to delete the startup sntries used by the VBS Worm or use other tools to make the job easier, especially if you are not familiar with regedit.  Here is a list of some of the tools:


  • msconfig (there are better alternatives)
  • HijackThis
  • Hijack Hunter
  • Autoruns
  • CCleaner
  • System Explorer, etc.
If you are unfamiliar with these tools, better seek proper guidance before doing some manual malware removal.  Also create a System Restore Point (optional) just in case.


Using CCleaner


Launch CCleaner and go to Tools | Startups. Highlight the entry and click the Disable or Delete button.
 
Go to Tools | Startups. Highlight the entry and click the Disable or Delete button.
Using CCleaner to delete or disable the vbs worm startup entry


Click OK.


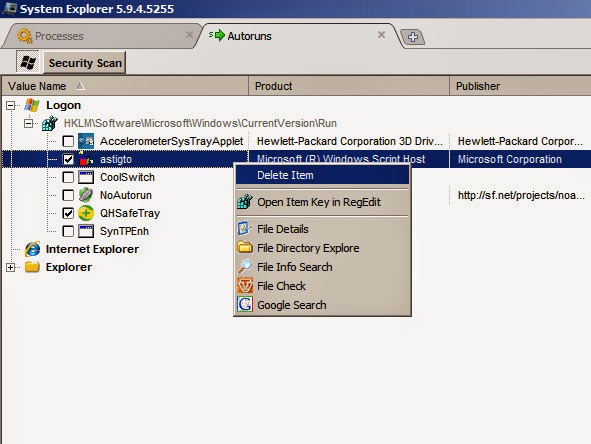
Using System Explorer


Launch System Explorer.  Go to the Autoruns tab. Right click on the Windows Script Host entry and select Delete Item.
Using System Explorer to delete the vbs worm startup entry


Launch System Explorer.  Go to the Autoruns tab. Right click on the Windows Script Host entry and select Delete Item.


Watch the video on how to remove a vbs worm


How to manually remove a vbs worm 


To be continued...


Thursday, July 22, 2010

How to uninstall remove Antivir Solution Pro (Virus Removal Guide)

The Antivir Solution Pro virus is, in its great part, a “standard” rogue (fake) anti-spyware (just like the Security Master AV virus we talked about in one of our previous removal guides) that has only one goal: making you believe that your computer is infected so that you pay for the full program. As Antivir Solution Pro virus is a scam, the only thing you should do is remove the Antivir Solution Pro virus using the removal guide below.

But before we reach the main part of this article, you should be aware that Antivir Solution Pro got on your computer when you visited an infected website and came across some malware or some exploit kits that installed Antivir Solution Pro on your computer. Obviously enough, if you don’t make sure that you computer is protected when surfing the web, there is a big chance that Antivir Solution Pro or a similar rogue will install itself on your computer again in the future.

What does the Antivir Solution Pro virus do ?

Basically, Antivir Solution Pro is a fake anti-spyware program that will always state that your computer is infected so that you buy the software (don’t buy Antivir Solution Pro as it is a scam). In addition, it will block some applications from running and mess up your Internet Explorer settings so that you might not be able to get your computer online.

How to protect your computer against Antivir Solution Pro and other similar viruses / rogues:

Well, first of all, it would be great if you had an updated antivirus suite installed on your computer (suck as Kaspersky Internet Security, Nod 32, or the free Avast Antivirus or MSE).

It is also very important that your Windows operating system has all the security patches installed and that Adobe Flash, Adobe Reader and similar software are also up to the current, updated version. For a more detailed list of the software installed on your computer that needs an update, you can run the Secunia Online Software Inspector.

Try using a more secure web browser such as Mozilla Firefox or Google Chrome.

How to remove the Antivir Solution Pro virus


Ok, so I had to edit the steps a little, because Antivir Solution Pro seems to be very active and we’ll have to close the process before anything else can be done. You will need to download iExplore.exe on another computer (iExplore is a great tool developed by Lawrence Abrams from bleepingcomputer.com. It will stop the Antivir Solution Pro process, so that we’ll be able to remove it.) and then transfer it on the desktop of the infected computer (use an USB stick or a CD/DVD).

1. Ok, now that we are set to go, we should stop the Antivir Solution Pro process so that we can remove it. To do this, run iExplore until Antivir Solution Pro is gone. Try to run it multiple times simultaneously if you feel like you’re getting nowhere. But don’t worry, iExplore will get the job done eventually.

2. If you only have Internet Explorer installed, you will have to undo the changes this virus did in your Internet Explorer settings so that you can surf the Internet once again. To do this:

* Open Internet Explorer and go to Tools->Internet Options.
* Now click the “Connections” tab, then the LAN Settings button in the bottom half of the window.
* Now uncheck the “Use a proxy server for your LAN” option.

3. Now that you are able to connect to the Internet, you should download a few files and apps that will help us down the road. Just download the files linked to below on your desktop

Malwarebytes Anti-Malware – We will use MBAM for actually removing this virus from your computer.

SuperAntiSpyware – This will be our secondary option if MBAM does not do the job

4. Many people don’t give this as much importance, but I feel like it’s a needed step. Just to make sure, you should delete all temporary files from your computer (click for a tutorial on that).

5. Now that Antivir Solution Pro is no longer running, we should be able to remove it using MBAM. Just follow these steps:

* Run the MBAM setup from your desktop.
* Proceed with the standard install settings
* Make sure the software update itself once it has been installed
* When MABM is up and running, go to the Scanner tab and perform a full scan
* Wait for MBAM to scan your computer for Antivir Solution Pro, as well as for any other malware your computer might be infected with
* When the scan is complete, remove all detected infections

6. Although you should have removed the Antivir Solution Pro virus from your computer, if this routine doesn’t do the trick, I guess you could try the same steps, only that instead of using MBAM, you use SuperAntiSpyware this time.

Source: http://free-pc-guides.com/

Antivirus Live Removal

The Best Registry Cleaner Tool For Windows XP

Antivirus Live is a fake anti-spyware program that belongs to the same family as Antivirus System Pro. If your computer is infected with this malware, you will receive frequent notifications of exaggerated security threats and virus infections. The catch is that you have to buy the full version of the program in order to fix the problems.

Getting rid of this fakeware is not easy. This malware can hijack your browser and blocks certain processes that prevents manual uninstall procedures. And once the malware loads, it will consume 100 percent of your computer’s resources which will prevent you to perform effective system clean-up and troubleshooting.

Why you need to Get Rid of Antivirus Live Immediately?

You should scan your computer and remove all the infected files as soon as possible. This virus will not only trick you to buy a bogus program but it will also expose your computer to more security threats. Take note that the malware disables the installed antivirus program of your machine. This means that more viruses, Trojans, worms, and spyware can sneak inside your computer.

Worse, this spyware program has the potential to steal your private banking information. If you buy the full version, you will be asked to provide your credit card number. Rogue software developers therefore will be able to use your information for their criminal activities. Don’t take this threat lightly, such rogue software are developed by highly skilled software developers and they know how to steal the information.

How To Get Rid of Antivirus Live

If you want to remove this threat effectively from your computer, you should use a legit software which is capable of scanning your computer and removing this threat. This is a proven approach that can completely clean all traces of the virus from your system.

It is true that you can remove Antivirus Live manually. However, this approach is not recommended if you are not familiar with your computer’s system folders and registry. Manual removal requires modifications of registry entries and deletion of all files associated with Antivirus Live. If you delete just a single legitimate file in your system, your machine will never boot again.

Automatic Antivirus Live removal is the safest approach. All you need to do is to download a trusted anti-malware program. Reboot your computer and start it in safe mode. You can now install the anti-malware so that it can perform a full system scan. The software will catch all traces of the malware. You just have to delete them all in order to restore your computer’s integrity.

The next time you receive fake notifications from Antivirus Live, you must delete the virus immediately by using automated malware removal tool.

You should follow this guide if you want to Remove Antivirus Live quickly and effectively without leaving any trace of it on your computer. When you receive fake security threat notifications urging you to buy Antivirus Live, you have to act swiftly by deleting this virus from your computer. Use a reliable anti-malware program because it can remove all traces of Antivirus Live Virus and will protect your system form further infections.

Source: http://www.booshnews.com/

Wednesday, May 12, 2010

Analyst's View: Antivirus Rescue CDs

I examine nine AV rescue CDs designed to remove particularly nasty malware to determine which is the best disc, and if the free ones are good enough.

The other day a reader e-mailed me to ask about a situation that hadn't previously crossed my mind. He wanted to know which antivirus software would clean up a hard drive that he had removed from its original computer and mounted as a slave drive in his work computer. Now, every antivirus can scan files on all local drives, but he also wanted it to scan and clean the "foreign" drive's registry—a significantly more difficult task.

My first thought was that the "rescue CD" products offered by many antivirus vendors should do the job. You'd typically use such tools when a nasty threat resists removal by a regular antivirus program, or when malware fights back and balks security software installation. Rescue CDs work by booting into a different operating system (commonly some form of Linux), which rootkits and other threats that actively resist detection or removal are powerless against, because they never get launched.

Intrigued by the thought of which rescue CD could tackle the task, I quizzed nine antivirus vendors about their rescue CD products. They were:

Antivir Rescue CD (free) (Direct Download)
avast! BART CD ($149.95)
AVG Rescue CD (free)
BitDefender Rescue CD (free)
F-Secure Rescue CD (free)
Kaspersky Rescue Disk (free)
Norton Bootable Recovery Tool (free with license)
Panda SafeCD (free)
PC Tools Alternate Operating System Scanner (free)

Rescue CDs: Operating Systems and Disk Burning
Almost all the products boot into some variety of Linux. BitDefender and F-Secure specifically use Knoppix, Kaspersky boots into Gentoo, Panda runs Debian, and PC Tools created their own purpose-built Linux distro. Norton and avast! run under Windows PE (a preinstallation environment), and are the only two that aren't free. Windows PE licensing requirements mean Symantec can't give away the Norton product, so only those with a valid license key can use it. The avast BART CD is designed for a technician's toolbox; its $149 sticker price means that it's not for the average user. (Note that BART stands for Bootable Antivirus and Recovery Tool—there's no connection with the BartPE environment).

In most cases, you'll need to download an .ISO file and burn it to CD using a malware-free computer. Norton's disk is an exception—you download a wizard that handles the process of creating a CD or bootable USB drive. AVG and F-Secure also include the option to create a bootable USB drive rather than a CD. Kaspersky will add this ability in its 2011 edition. If you bought a boxed copy of your antivirus or security software you may already have a rescue CD. Those using AVG, BitDefender, F-Secure, Norton or Panda can simply boot from the product CD—the same will be true of Kaspersky's 2011 edition.

Rescue CDs: How They Work
All the rescue CDs listed here can scan and clean both FAT and NTFS drives. It may seem strange to even mention that fact, but, in the past, some rescue CD products limited their cleanup to one file system or the other. All of them except PC Tools have the built-in ability to download updates; PC Tools handles updates by building a new version of the CD every week. Antivir and avast! go further, updating the rescue CD image with every virus definition update.

The PC Tools and F-Secure CDs simply rename found threats so they're no longer executable, counting on the full antivirus product to complete the cleanup. The other applications attempt to disinfect, quarantine, rename or delete threats, but you'll still want to follow up with a full in-Windows antivirus scan. Avast!'s BART CD is an exception—it's designed to perform a complete cleanup without any help from another product. Avast! and Norton are the only ones of this group that can also clean up traces in the registry, which makes sense as they're the only ones built on Windows.

The reader whose query got me started on this investigation wanted to mount another system's hard drive as a slave in his system and use a tool that would clean up all file and Registry malware traces. All the products except PC Tools will clean up files on the foreign drive, but only avast!'s BART CD can remove malware traces in the "foreign" registry.

Rescue CDs: The One to Choose
If you run into a malware problem that gets past your existing antivirus protection or if entrenched malware prevents installation of security software I'd suggest you try as many of these as necessary to set things right (after all, seven of the nine rescue CDs discussed here are free). Those with a valid Norton product key should start with the Norton CD, as it can clean up more thoroughly than the free products. The true virus warrior who's working hard to clean up other people's drives, however, should go with avast!'s BART CD. It carries a premium, but technicians will surely recoup the cost of the software after just a few jobs.

Source: By: Neil J. Rubenking

Thursday, April 22, 2010

How To Remove SecurityTool Scareware

SecurityTool is extremely defensive scareware that can be near impossible to remove automatically. That's because SecurityTool blocks access to Task Manager, the Registry Editor, the Deskop, Safe Mode, and many executable files. You have to somehow disable the main process before any of the traditional scanners are going to work. Fortunately, a free tool from Microsoft can do the trick. Here's how.

Here's How:

1. Visit the Microsoft Process Explorer website. On the right side of the page is a link that says Run Process Explorer.

2. Click Run Process Explorer. In the ensuing dialog box, choose Save File.

3. Browse to a folder that will be easy to access from a command prompt. However, do not choose the Desktop, as SecurityTool can block access to files in the Desktop folder. Likewise, do not save the file to the Windows folder nor to any of the Windows subfolders.

4. After selecting the destination, rename procexp.exe to explorer.exe. Click Save.

5. Using command prompt, browse to the location of the saved file and run it. Once you have Process Explorer running, disable any processes that have randomnumber.exe as the name. For example, 63814426.exe or 26540522.exe or 4946550101.exe, etc.

6. You should now be able to run an up-to-date reputable antivirus or antispyware utility to remove SecurityTool. Do not reboot the system prior to full removal, otherwise the process will load again. If that should happen, repeat step 5 to disable the process.

Source: by Mary Landersman