Sunday, February 22, 2015

How to block or prevent malware from running Part 2

II.  Registry Tweaks

Blocking program execution

This technique is similar to what gpedit.msc would do when you don't allow an application from executing.  We will be using two registry scripts to accomplish this.  One is for blocking and another for unblocking.

Copy/paste the following and save it as Block.reg.   Just like in How to block or prevent malware from running Part 1, we'll be using wscript.exe as our example. 

Windows Registry Editor Version 5.00

; Block an application
[HKEY_CURRENT_USER\Software\Microsoft\Windows\CurrentVersion\Policies\Explorer]
"DisallowRun"=dword:00000001
[HKEY_CURRENT_USER\Software\Microsoft\Windows\CurrentVersion\Policies\Explorer\DisallowRun]
"1"="wscript.exe"


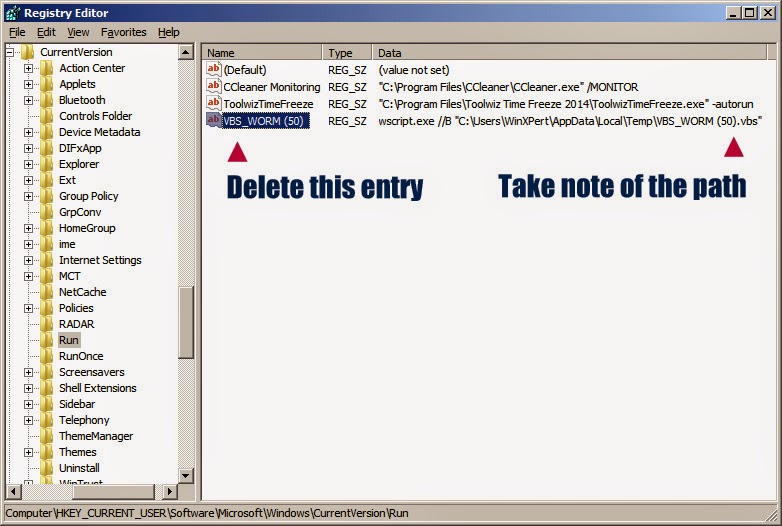
Running a VBS File with restrictions
Merge this to your registry to block wscript.exe. Log-out and log-in for the changes to take effect.  Once wscript.exe or any program or malware is blocked, you can now easily remove infections easily by doing a scan.

When you're done with scanning and your system is already clean from infections, you can unblock wscript.exe by using the next registry script.  Save the following as Unblock.reg.

Windows Registry Editor Version 5.00

; Unblock an application
[HKEY_CURRENT_USER\Software\Microsoft\Windows\CurrentVersion\Policies\Explorer]
"DisallowRun"=-
[HKEY_CURRENT_USER\Software\Microsoft\Windows\CurrentVersion\Policies\Explorer\DisallowRun]
"1"=-


Note that this technique is not limited to VBS worms.  I used this method for removing malwares like Daprosy worms, or any unknown trojan that can't be deleted easily because it's locked by a running process.  Sometimes, only gpedit.msc, taskman, regedit and cmd are all you need to remove low to medium malware threats.

Making Notepad the default file handler for VBS files

Another way to prevent VBS worms from running is to use Notepad instead of WScript as VBE and VBS files default file handler.  This way the worm would open in Notepad instead of executing making it easier to remove.

Copy/paste the following and save it as "Open VBE VBS with Notepad.reg"

Windows Registry Editor Version 5.00

;Open VBE/VBS file with Notepad by WinXPert
[HKEY_LOCAL_MACHINE\SOFTWARE\Classes\VBEFile\Shell\Open\Command]
@=hex(2):22,00,25,00,53,00,79,00,73,00,74,00,65,00,6d,00,52,00,6f,00,6f,00,74,\
00,25,00,5c,00,53,00,79,00,73,00,74,00,65,00,6d,00,33,00,32,00,5c,00,4e,00,\
6f,00,74,00,65,00,70,00,61,00,64,00,2e,00,65,00,78,00,65,00,22,00,20,00,25,\
00,31,00,00,00
[HKEY_LOCAL_MACHINE\SOFTWARE\Classes\VBSFile\Shell\Open\Command]
@=hex(2):22,00,25,00,53,00,79,00,73,00,74,00,65,00,6d,00,52,00,6f,00,6f,00,74,\
00,25,00,5c,00,53,00,79,00,73,00,74,00,65,00,6d,00,33,00,32,00,5c,00,4e,00,\
6f,00,74,00,65,00,70,00,61,00,64,00,2e,00,65,00,78,00,65,00,22,00,20,00,25,\
00,31,00,00,00


Opening a VBS File with Open VBE VBS with Notepad.reg merged to registry.

And here is the companion script to revert VBE/VBS handling back to it's default settings.  Save this one as "Open VBE VBS with WScript (Default).reg"

Windows Registry Editor Version 5.00

;Open VBE/VBS file with WScript.exe (default)
[HKEY_LOCAL_MACHINE\SOFTWARE\Classes\VBEFile\Shell\Open\Command]
@=hex(2):22,00,25,00,53,00,79,00,73,00,74,00,65,00,6d,00,52,00,6f,00,6f,00,74,\
00,25,00,5c,00,53,00,79,00,73,00,74,00,65,00,6d,00,33,00,32,00,5c,00,57,00,\
53,00,63,00,72,00,69,00,70,00,74,00,2e,00,65,00,78,00,65,00,22,00,20,00,22,\
00,25,00,31,00,22,00,20,00,25,00,2a,00,00,00
[HKEY_LOCAL_MACHINE\SOFTWARE\Classes\VBSFile\Shell\Open\Command]
@=hex(2):22,00,25,00,53,00,79,00,73,00,74,00,65,00,6d,00,52,00,6f,00,6f,00,74,\
00,25,00,5c,00,53,00,79,00,73,00,74,00,65,00,6d,00,33,00,32,00,5c,00,57,00,\
53,00,63,00,72,00,69,00,70,00,74,00,2e,00,65,00,78,00,65,00,22,00,20,00,22,\
00,25,00,31,00,22,00,20,00,25,00,2a,00,00,00


Running a VBS File with default file handler


To be continued...

Please visit my blog on manual malware removal

All my tutorials are FREE.  If you find this tutorial useful, please comment or share.  You can also help fund my continued work by making a donation.  Thank you and GOD bless!


To GOD be the glory!

All content ("Information") contained in this report is the copyrighted work of WinXPert: Virus and Malware Removal.

The Information is provided on an "as is" basis. WinXPert disclaims all warranties, whether express or implied, to the maximum extent permitted by law, including the implied warranties that the Information is merchantable, of satisfactory quality, accurate, fit for a particular purpose or need, or non-infringing, unless such implied warranties are legally incapable of exclusion. Further, WinXPert does not warrant or make any representations regarding the use or the results of the use of the Information in terms of their correctness, accuracy, reliability, or otherwise.

Copyright © 2015 WinXPert. All rights reserved. All other trademarks are the sole property of their respective owners.

Saturday, February 21, 2015

Repost: How To Disable Autorun


Removable USB/thumb drives use the Autorun feature to load files when the drives are plugged into the USB port. Malware exploits the Autorun feature to spread from thumb drive to PC. Disable the autorun feature to prevent malware from spreading.

1. The easiest and most effective means to truly disable autorun can be done via this simple autorun registry hack:

REGEDIT4
[HKEY_LOCAL_MACHINE\SOFTWARE\Microsoft\Windows NT\CurrentVersion\IniFileMapping\Autorun.inf]
@="@SYS:DoesNotExist"

2. To use this method, Open Notepad and copy/paste the following into a text file:

REGEDIT4
[HKEY_LOCAL_MACHINE\SOFTWARE\Microsoft\Windows NT\CurrentVersion\IniFileMapping\Autorun.inf]
@="@SYS:DoesNotExist"

Save the file as something.reg. (You have to be sure to change the "Save File as Type" to "All Files" before saving, or Windows will try to save it as a .txt even if you typed in .reg.

3. Locate the file you just saved and double-click the file to run it. You will receive a prompt asking if you want to add the data to the registry. Click yes to allow the modification.

4. The above method nulls any request for autorun.inf and works on XP Home or Pro, as well as Windows Vista. Credit for this tip goes to Nick Brown.

If you opt to disable autorun using any other method, you will first need to install an autorun patch from Microsoft that allegedly resolves issues that cause autorun to run even after it's been disabled (using methods other than the above recommended method).

5. XP Pro users who have installed the appropriate Microsoft patch for your system and wish to disable autorun using a method other than described above, follow steps 3 through 8 only. XP Home users begin at step 9.

6. Windows XP Pro users: Click Start and then click Run. Type gpedit.msc and click OK. The Group Policy window will open. In the left pane, double-click Administrative Templates

7. In the right pane, double-click System, scroll down the list and double-click Turn Off Autoplay

8. In the Turn Off Autoplay Properties window, select Enabled. From the dropdown next to Turn Off Autoplay on, select All drives and then click OK. Exit Group Policy by selecting File, then choosing Exit from the menu.

9. XP Home users will need to make the changes by editing the registry directly. To begin, click Start and then click Run

10. Type regedit and click OK. The Registry Editor window will open.

11. In the left pane, navigate to:
HKEY_CURRENT_USER
Software
Microsoft
Windows
CurrentVersion
Policies
Explorer
.

12. With Explorer highlighted, in the right-pane right click the value NoDriveTypeAutoRun and select Modify from the drop down menu. The base value will be set to Hexadecimal. If not, select Hexadecimal.

13. Type 95 and click OK.
Note that this will stop Autorun on removable/USB drives, but still allow it on CD ROM drives. If you want to disable autorun on both, substitute b5 for the 95. (Thanks to Ian L. of Manitoba for the tip).

14. Exit Registry Editor by selecting File, then choosing Exit from the menu.

15. You will now need to reboot your computer for the changes to take effect.

Source: http://antivirus.about.com/od/securitytips/ht/autorun.htm

How to Disable Autorun in Vista

A bug in Microsoft Vista executes programs in the Autorun.inf file when the Autorun feature has been disabled via the NoDriveTypeAutoRun registry value. If you've set the value NoDriveTypeAutoRun in the Windows Vista registry, delete the value and follow the steps below to really disable autorun in Vista.

Note: the steps below involved editing the System Registry.

Here's How:

1. The easiest and most effective means to truly disable autorun can be done via this simple autorun registry hack:

REGEDIT4
[HKEY_LOCAL_MACHINE\SOFTWARE\Microsoft\Windows NT\CurrentVersion\IniFileMapping\Autorun.inf]
@="@SYS:DoesNotExist"

2. The above method nulls any request for autorun.inf and works on XP Home or Pro, as well as Windows Vista. Credit for this tip goes to Nick Brown.

If you opt to disable autorun using any other method, you will first need to install an autorun patch from Microsoft that allegedly resolves issues that cause autorun to run even after it's been disabled (using methods other than the above recommended method).

3. The following steps apply to Windows Vista users only. See: How to Disable Autorun (Posted below)

4. Open the Registry Editor (regedit.exe) and browse to the following key:

HKLM\SYSTEM\CurrentControlSet\Services\Cdrom

5. In the right pane, right-click Autorun and select Modify.

6. Enter 0 for the Value data. Click OK, then exit the Registry Editor

7. Click Start, type autoplay and press enter. If prompted by User Access Control (UAC), click Continue.

8. Remove the check from 'Use AutoPlay for all media and devices'

You may also wish to change each individual item to 'Take no action'

9. Click Save and the Autoplay window will close.

10. The following steps involve using the Group Policy Editor (gpedit.msc). This feature is not available in Windows Vista Home or Windows Vista Home Premium editions.

11. Click Start, type gpedit.msc and press enter. If prompted by User Access Control (UAC), click Continue. The Group Policy Object Editor will open.

12. In the left pane under Computer Configuration, double click Administrative Templates, then double click Windows Components.

13. In the right pane, double click AutoPlay Policies and select (double click) 'Default Behavior for AutoRun'.

14. In the Default Behavior for Autorun Properties dialog, select Enabled. In the Default Autorun Behavior field, select Do not execute any autorun commands

15. Click Apply, then click OK and close the Group Policy Object Editor.

Source: http://antivirus.about.com/od/securitytips/ht/vista_autorun.htm

How To Autorun Worms: How to Remove Autorun Malware

Autorun worms spread from USB/thumb drives as well as fixed and mapped drives. Autorun worms typically drop or download additional malware, usually backdoors and password stealers. For a description of how Autorun malware works, see the Autorun FAQs. To remove an Autorn worm, follow the steps below.

Here's How:

1. Before attempting removal of an autorun worm, you must first disable Autorun. See: How to Disable Autorun or How to Disable Autorun in Vista posted below.

2. After you have disabled autorun, search the root of all drives (including all USB/thumb drives) for the presence of an autorun.inf file. When you have located the autorun.inf file, open it using a text editor such as Notepad and look for any lines that begin with Label=" and "shellexecute=". Note the name of the file designated by these lines.

3. Close the autorun.inf file and delete it from the drive. Now locate the file that was designated in Step 2 and delete that file as well.

4. Repeat these steps for all local, mapped, and removable drives.

5. Note that if an autorun worm is discovered, you should anticipate other infections have occurred and also that your antivirus/firewall/security software may have been disabled and/or tampered with. Ensure the antivirus is working properly by using an Eicar test file.

6. If you are unable to delete the malware files, or they reappear after deleting, use a bootable antivirus rescue CD to access the drive without allowing the malware to load first. You should then be able to delete the target files.

Source: http://antivirus.about.com/od/virusdescriptions/ht/autorunworms.htm


All my tutorials are FREE.  If you find this tutorial useful, please comment or share.  You can also help fund my continued work by making a donation.  Thank you and GOD bless!


How to block or prevent malware from running

Simple solutions for blocking malwares in Windows


I've been talking about manual malware removal in most of my blog, now we talk about prevention.  As the saying goes, "a byte of prevention better than a megabyte of cure."  This technique is not limited to blocking wscript.exe, which we will be discussing later, but to any application as long as you know the file name.  I've been using this procedure way back in 2009 to remove any unknown malware.

For starters, we use what's built in with Windows (I'll discuss 3rd party apps later) using Group Po;icy Editor, some registry tweaks and using a small VBS file to terminate all running scripts a few seconds after Windows startup.

I.  Group Policy Editor

  • Launch gpedit.msc
  • Go to User Configuration | Administrative Templates | System and double click on Don't run selected Windows applications


  •  Enable and click on Show... button

  • Click Add...


  • Type the filename of the application you want to block, wscript.exe in our example and click OK


  • Wscript.exe is now added to our list.  Click OK


  • Click OK


  • Exit gpedit.msc
Now let's test if our restriction works by running a vbs file.


That's is. Now you can easily remove any worm in your system by doing a full scan with an updated antivirus.

How to block or prevent malware from running Part 2

Please visit my blog on manual malware removal

Related posts:

How to delete startup entries 
How to terminate a process
 

All my tutorials are FREE.  If you find this tutorial useful, please comment or share.  You can also help fund my continued work by making a donation.  Thank you and GOD bless!


To GOD be the glory!

arnaldo.austria@gmail.com
https://www.facebook.com/groups/pinoytechrambo

All content ("Information") contained in this report is the copyrighted work of WinXPert: Virus and Malware Removal.

The Information is provided on an "as is" basis. WinXPert disclaims all warranties, whether express or implied, to the maximum extent permitted by law, including the implied warranties that the Information is merchantable, of satisfactory quality, accurate, fit for a particular purpose or need, or non-infringing, unless such implied warranties are legally incapable of exclusion. Further, WinXPert does not warrant or make any representations regarding the use or the results of the use of the Information in terms of their correctness, accuracy, reliability, or otherwise.

Copyright © 2015 WinXPert. All rights reserved. All other trademarks are the sole property of their respective owners.


Friday, February 20, 2015

How to terminate a process

Before attempting to do any malware removal, it is best to terminate the malware processes first to make your job easier.  I always remove malware in Normal Mode first so I'll be teaching you how to accomplish that.

Terminating a malicious process.  More than one way to skin a cat.

Your options are numerous.  We can start with what Windows already has provided us.  Task Manager and Taskkill.


Using Task Manager

You may have already know how to lauch Task Manager.  Ctrl+Alt+Del, Ctrl-Shift+Esc, Right click on Taskbar and Start Task Manager, Launch it via Run [Win+R], etc


  • Launch Task Manager
  • Go to the Processes tab
  • Hightlight the process you want to terminate
  • Click on the End Process tab at the lower right corner
  • or Right Click on the process and Select either End Process or End Process Tree

Using Taskkill

The syntax for TASKKILL for terminating a process is

    TASKKILL /F /IM ProcessName.exe

Lets's do a quick demo.  Launch Notepad and run the following

    TASKKILL /F /IM Notepad.exe

You can run this command at the CMD Prompt or with the Run [Win+R]


Using 3rd Party Utilities

No need for too much explanations here, I'll just provide my screenshots.  These are better alternatives to Task Manager


If you find this tutorial useful, please comment, share or email me. You can also make a donation to my PayPal account to help me continue my work. Thank you.
 
arnaldo.austria@gmail.com
Pinoy Tech RAMBO

To GOD be the glory! 


All content ("Information") contained in this report is the copyrighted work of WinXPert: Virus and Malware Removal.

The Information is provided on an "as is" basis. WinXPert disclaims all warranties, whether express or implied, to the maximum extent permitted by law, including the implied warranties that the Information is merchantable, of satisfactory quality, accurate, fit for a particular purpose or need, or non-infringing, unless such implied warranties are legally incapable of exclusion. Further, WinXPert does not warrant or make any representations regarding the use or the results of the use of the Information in terms of their correctness, accuracy, reliability, or otherwise.

Copyright © 2014-2015 WinXPert. All rights reserved. All other trademarks are the sole property of their respective owners.


Thursday, February 19, 2015

How to delete startup entries

Here's a technique I use to delete malwares located at the Startup folder using System Explorer.  Do this after terminating the malware first.


Note that you can go directly to the Startup folder, enable show hidden and system files and delete whatever malicious file is located there.  But with System Explorer, you can terminate the malware, delete other startup items the malware may have added to your system.

Monday, February 16, 2015

How to Remove a VBS Worm

In this tutorial, I'll be removing a worm that hides files and create shortcuts on all files located at the root directory of any external drives.


MD5 - bf42cc6bdab6539b6d4e5126ec66fdf4


Virustotal scan

Worm script.


 Here is what the worm does to your external drives.


First, we have to terminate the malicious WScript.exe process used by the worm.  Note that not all VBS files are malicious in nature.

You may use any of the following to terminate a process.
  • Task Manager
  • System Explorer
  • Process Explorer
  • DTaskManager or any similar utility
  • TASKKILL
I'll be using System Explorer throughout my manual malware removal tutorials.  You may use any app you like, it's more of a personal preference.

Right-click on WSCRIPT.EXE and End Process.


or you can use TASKKILL.  The systax is:
TASKKILL /F /IM WSCRIPT.EXE


Using Windows Task Manager to terminate a process.  Highlight wscript.exe and click on End Process.

Deleting the Startup entry from the Startup folder.

Right-click on VBS_WORM (50).vbs and click Delete Item


Deleting HKLM and HKCU entries.  

Right-click on VBS_WORM (50) and Open Item Key in Regedit


Take note of the location (path) of the worm first before deleting it in regedit


Delete both HKLM and HKCU Run entries.


Use Explorer to navigate to the location of the worm and delete it.


At the CMD Prompt, unhide the hidden files on your external drives.
In case the worm that infected your system also hides and create shortcuts of your folders, use the following command instead:
  • G: *
  • ATTRIB -S -H /S /D \*.*
* Change drive letter accordingly.


Delete the worm and shortcuts.


Repairing leftover registry entries.

Copy and paste the following and save it as FIX.REG.  Double click on the file or Merge to the registry file.  Click YES when prompted.

Windows Registry Editor Version 5.00


;BF42CC6BDAB6539B6D4E5126EC66FDF4


[HKEY_LOCAL_MACHINE\SOFTWARE\Microsoft\Windows\CurrentVersion\Run]
"VBS_WORM (50)"=-
 
[HKEY_CURRENT_USER\SOFTWARE\Microsoft\Windows\CurrentVersion\Run]
"VBS_WORM (50)"=-


[-HKEY_LOCAL_MACHINE\SOFTWARE\Microsoft\Tracing\wscript_RASAPI32]
[-HKEY_LOCAL_MACHINE\SOFTWARE\Microsoft\Tracing\wscript_RASMANCS]
[-HKEY_LOCAL_MACHINE\SOFTWARE\VBS_WORM (50)]

NOTE:  This is specific to this strains of worm.  In case the worm was renamed, it uses the new filename as the registry key, so you have to change FIX.REG accordingly.

Update your antivirus program and perform a full scan of the computer.


If you find this tutorial useful, please comment, share or email me. You can also make a donation to my PayPal account to help me continue my work. Thank you.
WinXPert


To GOD be the glory!

All content ("Information") contained in this report is the copyrighted work of WinXPert: Virus and Malware Removal.


The Information is provided on an "as is" basis. WinXPert disclaims all warranties, whether express or implied, to the maximum extent permitted by law, including the implied warranties that the Information is merchantable, of satisfactory quality, accurate, fit for a particular purpose or need, or non-infringing, unless such implied warranties are legally incapable of exclusion. Further, WinXPert does not warrant or make any representations regarding the use or the results of the use of the Information in terms of their correctness, accuracy, reliability, or otherwise.


Copyright © 2015 Arnaldo Austria. All rights reserved. All other trademarks are the sole property of their respective owners.

How to recover Windows password (Part 1)


You've been lock out of your PC.  You know you've typed the correct password but still it says your password is incorrect. 

Giving up already?  Well don't because there are may ways to replace or recover your lost password.

If you can log on to another Administrator account, this procedure might do the trick.

1.  At the log-on screen, do the following

[CTRL] + [ALT] + [DEL]
[DEL]


Type Administrator and hit Enter.

Note if your other Administrator account have a password, simply supply the correct one.

2.  If you were successful in step 1 then launch CMD and type the following

NET USER


This command will list all USERS in your system.

3.  Select the Account Username in question.  For example if your account name is WinXPert, type this command

NET USER WINXPERT *


Type the password for the user:
Retype the password to confirm:

Just type password.and hit Enter
and retype the password.and hit Enter

Note that what you type will not be visible

4.  Log out and Log in to your account with the new password.

Manual removal instructions for VBS_WORM (49).VBS

MD5 - C13DEF035FEA2919DEA2272ED8960921

Virustotal Scan

1.  Terminate WScript.exe process.


 2.  Delete Startup Items:  Startup folder, HKLM and HKCU.


3.  Delete the VBS files.


Using Everything to locate the VBS worms.


4.  Delete the VBS file and Shortcuts in your extenal drive.

5.  Repair the registry.

Copy and paste the following to Notepad and save it as fix.reg.  Merge fix.reg to your registry.

Windows Registry Editor Version 5.00
;C13DEF035FEA2919DEA2272ED8960921
[HKEY_LOCAL_MACHINE\SOFTWARE\Microsoft\Windows\CurrentVersion\Run]
"VBS_WORM (49)"=-

[HKEY_CURRENT_USER\SOFTWARE\Microsoft\Windows\CurrentVersion\Run]
"VBS_WORM (49)"=-

[-HKEY_LOCAL_MACHINE\SOFTWARE\Microsoft\Tracing\wscript_RASAPI32]
[-HKEY_LOCAL_MACHINE\SOFTWARE\Microsoft\Tracing\wscript_RASMANCS]
[-HKEY_LOCAL_MACHINE\SOFTWARE\VBS_WORM (49)]


NOTE:  This is specific to this strains of worm.  In case the worm was renamed, it uses the new filename as the registry key, so you have to change fix.reg accordingly.

6.  Unhide your folder and files in your external drive.


7.  Scan with an updated antivirus.

Using Qihoo 360 TS to scan and fix your external drive (bypassing steps 4 and 6). 


If you find this tutorial useful, please comment, share or email me. You can also make a donation to my PayPal account to help me continue my work. Thank you.

WinXPert


To GOD be the glory!

Related articles:

Ultimate Guide in Removing VBS Worms


All content ("Information") contained in this report is the copyrighted work of WinXPert: Virus and Malware Removal.


The Information is provided on an "as is" basis. WinXPert disclaims all warranties, whether express or implied, to the maximum extent permitted by law, including the implied warranties that the Information is merchantable, of satisfactory quality, accurate, fit for a particular purpose or need, or non-infringing, unless such implied warranties are legally incapable of exclusion. Further, WinXPert does not warrant or make any representations regarding the use or the results of the use of the Information in terms of their correctness, accuracy, reliability, or otherwise.


Copyright © 2015 Arnaldo Austria. All rights reserved. All other trademarks are the sole property of their respective owners. 

Wednesday, February 11, 2015

Removal instructions for 1.vbe


Analysis:


Type of file: VBEFile
Description:
Location: C:\Documents and Settings\Administrator\Local Settings\Temp\
Size: 30211 b
MD5: C7E1090127561E8A518D5A508059027E

Known system changes:

Keys added: HKLM\SOFTWARE\1

Values added:

HKLM\SOFTWARE\Microsoft\Windows\CurrentVersion\Run\1: "wscript.exe //B "C:\DOCUME~1\Admini~1\LOCALS~1\Temp\1.vbe""
HKLM\SOFTWARE\1\: "false - 10/25/2014"


Files added:
C:\Documents and Settings\Owner\Local Settings\Temp\1.vbe
C:\Documents and Settings\Owner\Start Menu\Programs\Startup\1.vbe
F:\1.vbe
F:\New Text Document.lnk
F:\New Folder.lnk

Files [attributes?] modified:
F:\New Text Document.lnk


Manual Removal Instructions for 1.vbe:
If your computer does not have an up-to-date antivirus, or does not have an antivirus solution at all, follow the instructions below to delete the malicious program:
Make sure you create a System Restore point before proceeding:


1.  Use Task Manager to terminate the malicious process wscript.exe

2.  Delete the 1.vbe from these locations.
  • %Temp%
  • %UserProfile%\Start Menu\Programs\Startup
  • Root directory of USB drives
  •  
3.  Repair the registry using this reg script.  Note that registry key 1 is random and takes the filename of the vbe file.


Windows Registry Editor Version 5.00
[HKEY_LOCAL_MACHINE\SOFTWARE\Microsoft\Windows\CurrentVersion\Run]
"1"=-
[-HKEY_LOCAL_MACHINE\SOFTWARE\1]
4.  Delete all *.lnk located at the root directory of your external drives.  Replace DRIVE with the correct drive letter assignment of your external drives.

DEL DRIVE:\*.LNK

5.  Unhide all hidden files and folders using this commands:  Replace DRIVE with the correct drive letter assignment of your external drives.


ATTRIB DRIVE:\*.* -S -H /S /D

6.  Update your antivirus/antimalware program and perform a full scan of the computer.


All content ("Information") contained in this report is the copyrighted work of WinXPert: Virus and Malware Removal.
The Information is provided on an "as is" basis. WinXPert disclaims all warranties, whether express or implied, to the maximum extent permitted by law, including the implied warranties that the Information is merchantable, of satisfactory quality, accurate, fit for a particular purpose or need, or non-infringing, unless such implied warranties are legally incapable of exclusion. Further, WinXPert does not warrant or make any representations regarding the use or the results of the use of the Information in terms of their correctness, accuracy, reliability, or otherwise.
Copyright © 2014-2015 WinXPert. All rights reserved. All other trademarks are the sole property of their respective owners.

Sunday, February 8, 2015

Saturday, February 7, 2015

How to fix a corrupt HDD in Linux

How to fix a corrupt HDD in Linux

When to do this?  In cases you can't boot in Windows and don't have a Windows bootable repair disc.


How to make a Bootable UFD (WinSetupFromUSB Tutorial)

How to make a Bootable UFD (WinSetupFromUSB Tutorial)


Download WinSetupFromUSB here